Most bathroom leakage, damp walls, and cracking or hollowing tiles in Pakistani homes don't actually have a tile or grout problem, they have a sequence problem. The bathroom was tiled first with little or no waterproofing beneath, or waterproofing was applied incorrectly, and water has been living under the tiles doing invisible damage ever since. Here's what proper bathroom waterproofing before tiling actually involves, and why skipping it is one of the leading causes of tile failure within 2-5 years in Pakistani construction specifically.
Need the chemical/membrane products themselves? See our Waterproofing Services guide.
The Misconception That Causes This Problem
Many homeowners and even some contractors genuinely believe tiles and grout provide sufficient water protection on their own. They don't. Grout is porous, water passes through it readily, especially in bathrooms where surfaces are wet every single day. Tiles and grout are water-resistant, not waterproof; the actual waterproof membrane beneath the tiles is what protects the structure underneath, not the visible tile surface itself.
This matters particularly in Pakistan's construction context, where bathrooms see constant daily use and monsoon humidity adds external moisture pressure to buildings beyond just daily shower/wash use, a combination that makes skipped waterproofing fail faster than it might in a drier climate.
The Correct Process, Step by Step
1. Prepare the substrate. The surface must be clean, dry, and structurally sound before any waterproofing membrane is applied, this is the same foundational principle covered in our roof leak diagnosis guide, applied here to bathroom floors and walls specifically.
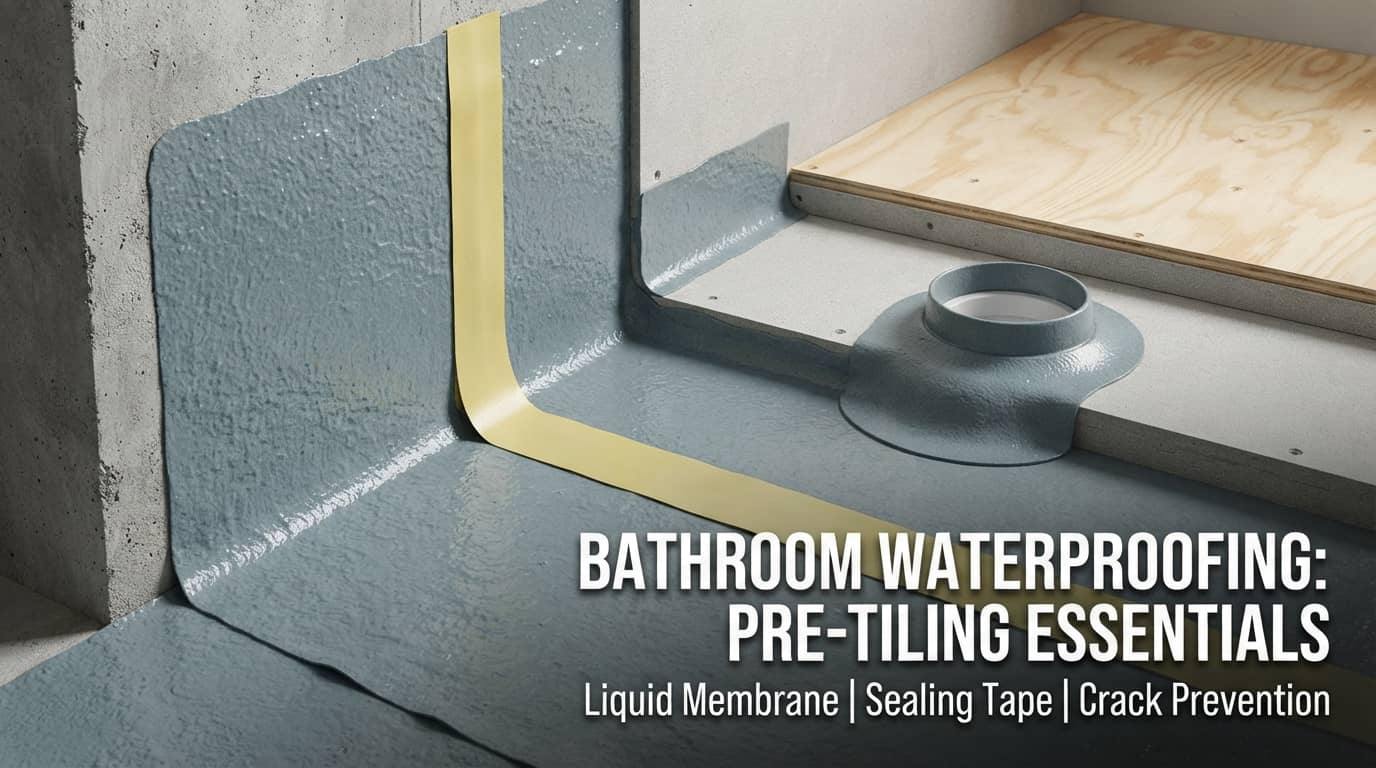
2. Apply the waterproof membrane. A certified waterproofing product (liquid membrane or sheet membrane, depending on the system) is applied across the floor and up the walls, critically, this extends beyond just the floor.
3. Extend membrane coverage correctly. In shower areas specifically, the membrane should extend from the floor to the full height of the shower walls. Outside the direct shower area, standard practice runs the membrane at least 6-12 inches up surrounding walls, creating a watertight basin effect and preventing leaks at perimeter joints where floor meets wall.
4. Reinforce corners and pipe penetrations specifically. Corners, floor-wall junctions, and any pipe penetration points are consistently the weakest points in a waterproofing system, skipping proper reinforcement at these specific points is genuinely one of the most common mistakes, since a contractor may waterproof the flat surfaces correctly while neglecting these transition points.
5. Apply adequate coating thickness, one coat is not enough. In a permanently wet area, the constant water pressure from daily shower use pushes through a thin single coat over time. Two coats minimum is standard for general bathroom areas, with three coats recommended for direct shower zones specifically facing the most sustained water exposure.
6. Allow full curing time before tiling. This is arguably the single most commonly rushed step: curing typically takes 12-48 hours depending on temperature, humidity, and the specific product used. Tiling before the membrane has fully cured causes adhesion issues that are extremely difficult to correct without removing all the tiles and starting the waterproofing process over, a genuinely costly mistake to make.
7. Perform a flood test before tiling. The drain is plugged, the area is filled with water, and the water level is monitored for at least 24 hours to confirm the waterproofing system is fully sealed. If the water level remains unchanged, the system is verified ready for tile installation. Skipping this verification step means you won't discover a waterproofing failure until well after tiles are already installed, at which point the fix becomes dramatically more expensive.
What Happens When This Process Is Skipped or Rushed
Water passing through porous grout and tiny inevitable cracks (which develop as buildings naturally shift over time) reaches the substrate beneath. Without a proper waterproof membrane, this moisture has nowhere to go, leading to mold growth, structural damage to subfloor material, tiles that hollow out and eventually crack or lift, and damp patches or discoloration on walls in rooms below or adjacent to the bathroom, problems that typically don't appear immediately, only becoming visible well after the "finished" bathroom looked perfect on completion day.
Which Areas Genuinely Need This Treatment?
Have questions about this?
Chat with us on WhatsApp. We usually reply within minutes.
Not every tiled surface carries the same risk. Bathroom floors are permanently wet environments and always need waterproofing. Shower walls, given constant direct water exposure, need full-height membrane coverage. Kitchen splashback zones, while less constantly wet than a bathroom, still benefit from the same principle given regular water exposure during cooking and cleaning. Dry indoor tiled areas (like a living room floor) generally don't require this treatment, though some contractors apply it anyway for added long-term protection in a broader renovation.
What to Ask Your Contractor Before Tiling Begins
Given how commonly this step gets skipped or rushed, ask directly:
- "What waterproofing product are you using beneath the tiles, and how many coats?"
- "How far up the walls will the membrane extend, especially in the shower area?"
- "How long will you allow the membrane to cure before starting tile installation?"
- "Will you perform a flood test before tiling, and can I see the results?"
A contractor confident in doing this correctly should answer all four specifically, see our full contractor-vetting guide for the broader framework these questions fit into.
Related Guides
- Waterproofing Services, Chemical & Membrane Guide
- How to Choose a Waterproofing Company Without Getting Scammed
- How to Diagnose and Fix a Roof Leak Before Monsoon
Frequently Asked Questions
Q1: Do tiles and grout provide enough waterproofing on their own? No, this is one of the most common misconceptions in bathroom construction. Grout is porous and water passes through it readily, especially in bathrooms used daily. Tiles and grout are water-resistant, not waterproof; a proper waterproof membrane installed beneath the tiles is what actually protects the structure, not the visible tile surface itself.
Q2: How many coats of waterproofing membrane does a bathroom actually need? A single coat isn't enough in a permanently wet area, the constant water pressure from daily shower use pushes through a thin single coat over time. Two coats minimum is standard for general bathroom surfaces, with three coats recommended specifically for direct shower zones facing the most sustained water exposure.
Q3: How high up the wall should bathroom waterproofing membrane extend? In shower areas specifically, the membrane should extend from the floor to the full height of the shower walls. Outside the direct shower area, standard practice runs the membrane at least 6-12 inches up surrounding walls, creating a watertight basin effect that prevents leaks at perimeter floor-wall joints.
Q4: How long should waterproofing membrane cure before tiling begins? Typically 12-48 hours depending on temperature, humidity, and the specific product used, always confirm your product's specific instructions. Tiling before the membrane has fully cured causes adhesion issues that are extremely difficult to correct without removing all tiles and redoing the waterproofing process, a genuinely costly mistake.
Q5: What is a flood test, and why does it matter for bathroom waterproofing? A flood test involves plugging the drain, filling the area with water, and monitoring the water level for at least 24 hours before tiling begins, if the level remains unchanged, the waterproofing system is confirmed sealed. Skipping this verification means a waterproofing failure won't be discovered until after tiles are already installed, making the eventual fix dramatically more expensive.
Q6: Why do corners and pipe penetrations matter so much in bathroom waterproofing? Corners, floor-wall junctions, and pipe penetration points are consistently the weakest points in a waterproofing system, since they require careful reinforcement beyond simply coating flat surfaces. A contractor may correctly waterproof flat floor and wall areas while neglecting these transition points, which then become the actual source of eventual leaks.
Q7: What questions should I ask my contractor before bathroom tiling begins? Ask what waterproofing product they're using and how many coats, how far up the walls the membrane will extend (especially in the shower), how long they'll allow curing before tiling starts, and whether they'll perform and show you the results of a flood test. See our full waterproofing contractor vetting guide for the complete framework.
Have questions about this?
Chat with us on WhatsApp. We usually reply within minutes.