Thermocol sheet is genuinely effective insulation, when installed correctly. The problem is that "installed correctly" involves several details that aren't obvious from just looking at a sheet of foam, and getting even one of them wrong can leave you with a roof that's still hot, still leaking, or both, despite having spent the money on insulation that should have fixed it. Here are the four mistakes we see most often.
Reviewing the installation process itself? See our step-by-step installation guide alongside this list.
Mistake #1: Using the Wrong Adhesive
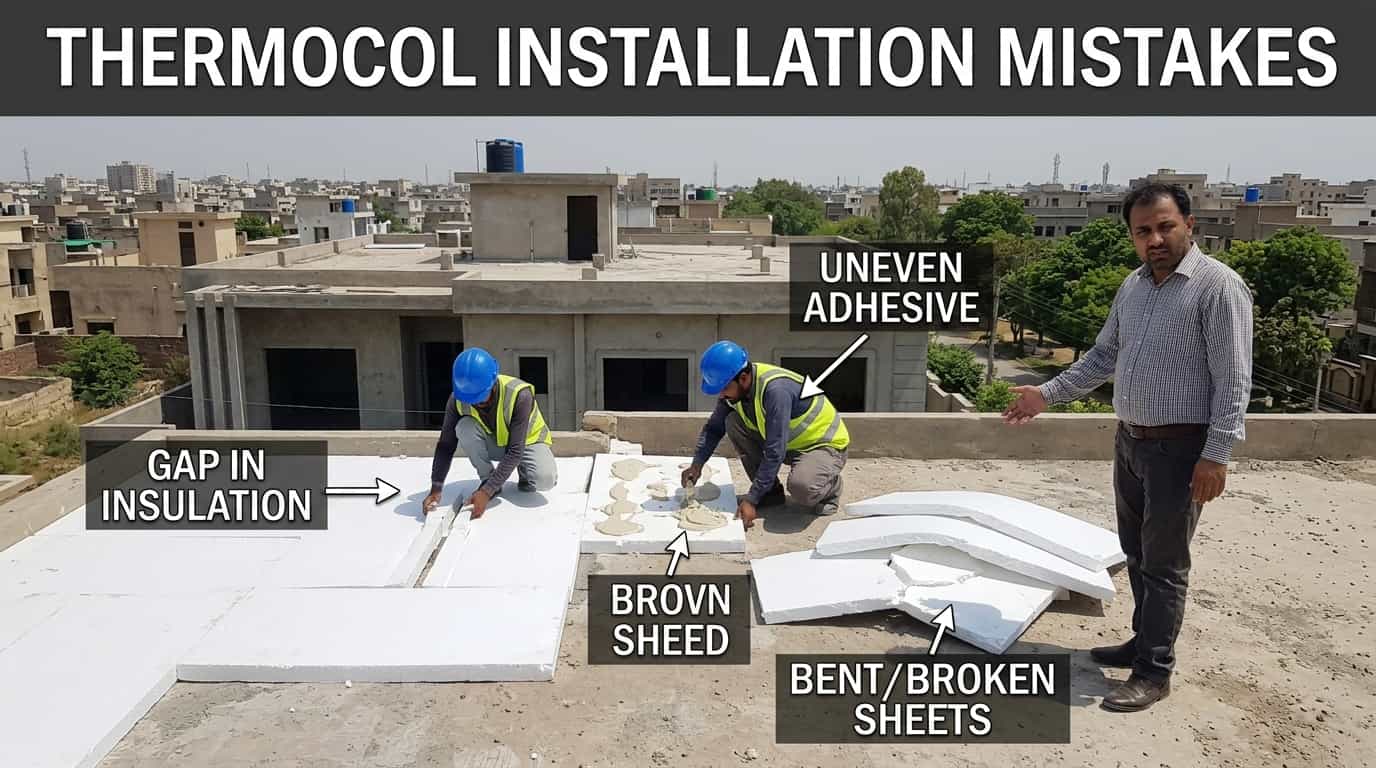
Thermocol has no natural adhesive property, it needs a construction adhesive specifically rated for polystyrene foam. The mistake: using a generic, general-purpose adhesive because it's cheaper or more readily available, not realizing that some adhesives can actually dissolve or degrade the foam rather than bond it properly.
The wasted-money version of this mistake: sheets that appear installed correctly on day one, then start peeling, sagging, or developing gaps within months as the wrong adhesive fails or damages the foam from behind, meaning you pay for both the original installation and the eventual redo.
The fix: confirm with your supplier specifically that any adhesive used is polystyrene-compatible before installation begins, not after problems appear.
Mistake #2: Leaving Gaps at the Joints
This is the single most common mistake in Pakistani thermocol installations, and it's genuinely easy to miss during installation because the sheets themselves look properly placed. Ensuring sheets are tightly joined without air gaps is essential, a gap at even one joint creates thermal bridging, where heat sneaks through the weak point regardless of how well-insulated the rest of the roof is.
Why this wastes money specifically: you've paid for full-roof insulation coverage, but a few unsealed joints mean you're getting meaningfully less than full insulation performance, the AC bill savings you expected don't fully materialize, and it's genuinely hard to diagnose after the fact why the results are underwhelming.
The fix: seal every joint with weatherproof tape or adhesive compound as a mandatory step, not an optional finishing touch, this applies even to joints that look tight by eye.
Mistake #3: Skipping Roof Repair Before Installation
Installing thermocol sheet directly over an existing roof leak or crack doesn't fix the leak, it hides it. The water damage continues underneath the new insulation, now invisible until it's caused enough damage to show through some other way, at which point removing the insulation to access and repair the original problem costs more than fixing it would have cost before installation.
Why this wastes money specifically: you end up paying for the insulation installation, then later paying again to remove it, fix the underlying roof problem, and reinstall, a genuinely avoidable double cost.
The fix: always inspect and repair any visible leaks or cracks before thermocol installation begins, even if it means a short delay to the insulation project.
Mistake #4: No Protective Layer on Top
Thermocol left exposed to direct foot traffic, falling debris, and continuous weather exposure degrades faster than thermocol protected by a waterproofing membrane or concrete screed layer on top. This is a mistake of omission, skipping a step that feels optional in the moment but genuinely extends (or shortens) the insulation's working life.
Why this wastes money specifically: unprotected thermocol needs replacement sooner than protected thermocol, meaning you effectively pay for the insulation twice over a shorter combined timeframe than a properly protected installation would have required.
Have questions about this?
Chat with us on WhatsApp. We usually reply within minutes.
The fix: budget for and include a protective top layer (waterproofing membrane or screed, depending on your specific roof use) as part of the total project cost from the start, not as an afterthought once the sheets are already down.
The Pattern Behind All Four Mistakes
Notice that none of these four mistakes are about the thermocol sheet material itself being defective, they're all about installation process details that are easy to skip when trying to save time or cost in the moment, but that compound into a worse outcome (and higher total cost) than doing it right the first time would have been.
Related Guides
- Thermocol/EPS Sheet, Full Pricing Guide
- How to Install Thermocol Sheet, Step-by-Step
- Thermocol vs Jumbolon vs PU Foam
- Roof Heat Proofing
Frequently Asked Questions
Q1: Why is my thermocol-insulated roof still hot after installation? The most likely cause is gaps at the sheet joints creating thermal bridging, where heat passes through unsealed weak points regardless of how well the rest of the roof is insulated. Check that every joint was properly sealed with weatherproof tape or adhesive compound, this is the most commonly missed step in Pakistani thermocol installations.
Q2: My thermocol sheets are peeling or sagging, what went wrong? This is typically caused by using the wrong type of adhesive, one not specifically rated for polystyrene foam. Some general adhesives can dissolve or degrade the foam over time rather than bonding it properly, causing sheets to fail months after an installation that initially appeared successful.
Q3: Should I fix a roof leak before or after installing thermocol sheet? Always before, installing thermocol over an existing leak or crack hides the problem rather than solving it, allowing water damage to continue underneath the new insulation invisibly. Repairing leaks first avoids the more expensive scenario of later removing installed insulation to access and fix the original problem.
Q4: Do I really need a protective layer on top of thermocol sheet? Yes, generally, thermocol left exposed to foot traffic, debris, and continuous weather exposure degrades faster than thermocol protected by a waterproofing membrane or concrete screed. Skipping this step is a common way installations end up needing replacement sooner than they should, effectively costing more over time than including proper protection from the start.
Q5: How do I know if my thermocol installation was done correctly? Check for these four things: confirm polystyrene-compatible adhesive was used, inspect joints for any visible gaps (these should be fully sealed with weatherproof tape or compound), confirm any pre-existing roof leaks were repaired before installation, and confirm a protective top layer (membrane or screed) was applied if appropriate for your roof's use.
Q6: Can these mistakes be fixed after installation, or do I need to start over? It depends on the mistake. Unsealed joints can often be identified and sealed after the fact without full reinstallation. Wrong adhesive causing peeling/sagging usually does require removing and reinstalling the affected sheets. A skipped roof repair underneath the insulation typically requires removing the insulation in that area to access and fix the underlying problem properly.
Q7: Is it cheaper to hire a professional installer to avoid these mistakes? Often yes, when you account for the total cost including potential rework. Professional installers who do this regularly are less likely to make these four specific mistakes, and the labour cost of professional installation is frequently smaller than the combined cost of a DIY mistake plus the eventual fix. For larger or more complex roofs, this math tends to favor professional installation clearly.
Have questions about this?
Chat with us on WhatsApp. We usually reply within minutes.